Service Example 5: Simple Web application
Introduction
In this article, we'd like to showcase to you a simple web application, representing a typical set-up consisting of an HTTP back-end that connects to an SQL database.
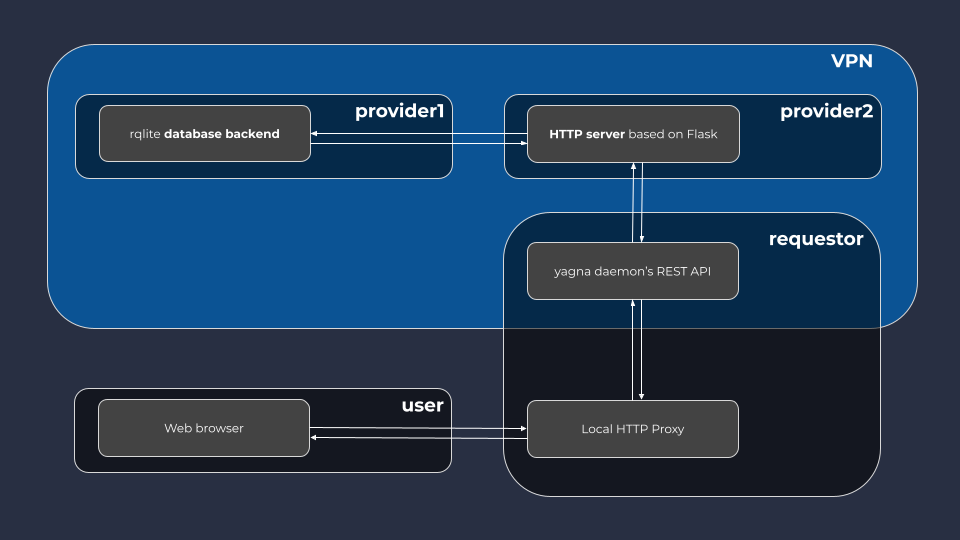
Both services here are running on separate provider nodes and are connected to both each other and to the requestor through a VPN.
Therefore, we're presenting you the usage of:
- Golem VPN
- Local HTTP Proxy
- Yapapi Services
Full code of the example is available in the yapapi repository: https://github.com/golemfactory/yapapi/tree/master/examples/webapp
Prerequisites
In case you'd like to experiment yourself, and it's your first contact with Golem app development, you're invited to first have a look at our requestor development primer which will guide you through the introductory steps.
Application outline

As you see in the above diagram, the application consists of:
- two services running inside VM containers on the provider nodes:
- rqlite database backend - rqlite is, according to its authors, an "easy-to-use, lightweight, distributed relational database, which uses SQLite as its storage engine". All of these features make it an ideal candidate for a DB back-end of a Golem application. Especially its clustering capabilities sound interesting for a more advanced use case where we replicate the database across several providers to improve its survability and leverage the distributed nature of Golem itself.
- a Flask-based HTTP server - for the sake of simplicity, we have decided to use Flask. Flask provides an extremely minimalistic interface which allows the developer to build a fully functioning HTTP-based web application using a very small amount of code. Additionally, we added SQLAlchemy as the DB connectivity layer.
- the requestor agent which:
- defines a VPN using yagna daemon's REST API and adds both the provider nodes and itself to this VPN,
- uses yapapi's Services API to commission one instance of each of the above services from Golem provider,
- exposes the Flask HTTP Server described above to the outside world through a Local HTTP proxy - a small HTTP server which accepts connections from a port on the requestor's host machine and routes them to the appropriate service on the provider's end through yagna daemon's websocket API.
The VPN
A VPN, short for a Virtual Private Network, is a concept where a private IP network is created in such a way that it spans over other, possibly public networks while giving the all the nodes in this network a semblance of staying within one local area network.
In the context of the Golem Network, the VPN is constructed between the providers and requestors, utilizing the network's transport layer to tunnel IP traffic. The requestor defines the network and a mapping between IP addresses and Golem node identifiers and keeps the involved nodes up to date with the mapping. A specific activity on a given provider is attached to the network by issuing an appropriate deploy command which adds a network interface bound to the specific IP address to this execution unit.
Within the resultant network, the provider runtimes are able to freely connect between each other as long as their ports are open and there are services listening on them. On the other hand, they cannot directly connect to ports on the requestor address and connections from the requestor to the providers are performed through a websocket API exposed by the yagna daemon as part of its REST API.
Later in this article, we'll show you how to connect from one provider node to another and how to set up connections from the requestor to the provider.
The services
Both services - the DB and the HTTP server - utilize Golem's VM runtime and their payload is defined using pretty straightforward Dockerfiles. Similarly, on the requestor's end, they're represented by fairly simple Service class definitions.
We'll cover both the dockerfiles and the appropriate Python classes later in the article.
The HTTP proxy
Because the ports inside the VMs are not directly accessible to the outside world, we need a mechanism that will allow such connections. As mentioned above, yagna daemon provides an API to open websocket connections to specific ports on specific provider nodes.
To make usage of this websocket interface in third party apps effortless, we have created a reusable component - the LocalHttpProxy - which, when coupled with a HttpProxyService class, that's part of the same package, provides a straightforward way to map a local HTTP port on a requestor's machine to a specific provider-end service.
The details
DB back-end
As mentioned earlier, we have decided to use rqlite for our DB engine. The most important reason is that it's very lightweight and extremely easy to set-up. Furthermore, its built-in clustering capabilities are its flagship feature and this aligns perfectly with distributed Golem applications that would hugely benefit from the high availability and fault tolerance which such clustering makes possible. Having said that, for the sake of simplicity, we are not using rqlite's clustering capabilities in this example.
We based our Dockerfile for the rqlite service on the original provided by the rqlite project but couldn't use it directly for two reasons:
- Golem's GVMI format and VM runtime don't currently support
ENTRYPOINTandCMDcommands. - Golem runtimes use a simple
9pfilesystem for volumes and rqlite uses features that are not supported by9p. Therefore, we chose not to map rqlite's datadir to a VOLUME but rather run in on the in-memory drive.
Here's the resultant Dockerfile: https://github.com/golemfactory/yapapi/tree/master/examples/webapp/db
The key information about the rqlite's image is that the daemon is configured to listen on port 4001 and that's where we'll need to direct our Flask app for its DB connection.
Flask application
Why Flask?
As we're using Python to write the requestor agent (yapapi being a Python library), we have also decided to write the web application in Python to make this simpler for you, the reader, to follow through. Apart from that, it could be written in any other language that lets you build HTTP-based web apps.
Likewise, we decided to use Flask since this framework allows us to define a HTTP-based application in a very simple and straightforward way, in just a few lines of code, with no prior set-up. Again, we could use other frameworks and/or more involved configurations.
At the end, when you build your own app, all it matters is that whatever language and framework you choose and whatever configuration you employ, as long as it fits into a Docker image and responds to HTTP requests, you'll be good to go.
The app
Again, for simplicity's sake, the app we're showcasing here is purposefully trivial. We asked ourselves: what would be the simplest possible app that reads and writes to the db and has a user-facing interface? The result is a oneliner chat: it contains just a single input field and a submit button. When submitted, it sends the input to the db and comes back with all the entries that had previously been sent to the db ordered starting from the latest entry, essentially forming a very crude chatroom.
The web app itself consists of just two files - Python source file and the HTML template.
Here's the source (app.py):
import argparse
from flask import Flask, render_template, request, redirect, url_for
from flask_sqlalchemy import SQLAlchemy

parser = argparse.ArgumentParser("simple flask app")
parser.add_argument("--db-address", help="the address of the rqlite database", default="localhost")
parser.add_argument("--db-port", help="the  of the rqlite database", default="4001")

subparsers = parser.add_subparsers(dest="cmd", required=True)

subparsers.add_parser("initdb", help="initialize the database")
run_parser = subparsers.add_parser("run", help="run the app")
args = parser.parse_args()

app = Flask(__name__)
app.config["SQLALCHEMY_TRACK_MODIFICATIONS"] = False
app.config["SQLALCHEMY_ENGINE_OPTIONS"] = {"echo": True}
app.config["SQLALCHEMY_DATABASE_URI"] = f"rqlite+pyrqlite://{args.db_address}:{args.db_port}/"

db = SQLAlchemy(app)


class Line(db.Model):
    id = db.Column(db.Integer, primary_key=True)
    message = db.Column(db.String(255))


@app.route("/", methods=["get"])
def root_get():
    return render_template("index.html", messages=Line.query.order_by(Line.id.desc()).limit(16))


@app.route("/", methods=["post"])
def root_post():
    db.session.add(Line(message=request.form["message"]))
    db.session.commit()
    return redirect(url_for("root_get"))


if args.cmd == "initdb":
    db.create_all()
elif args.cmd == "run":
    app.run(host="0.0.0.0")
and the template (templates/index.html) used to render the views:
<!DOCTYPE html>
<html lang="en">
  <head>
    <meta charset="UTF-8" />
    <title>Onliner</title>
  </head>
  <body>
    <form method="post">
      <input type="text" name="message" />
      <input type="submit" value="send" />
    </form>
    <hr />
    {- for msg in messages %}
    <!-- removed % after { -->
    <p>{{ msg.message }}</p>
    {- endfor %}
    <!-- remove % after { -->
  </body>
</html>
Apart from Flask, it specifies just two additional dependencies: flask-sqlalchemy and sqlalchemy_rqlite. The first one is a binding which allows SQLAlchemy models to be easily added to a Flask app and the latter is a driver for SQLAlchemy that allows it to use rqlite as its DB engine.
And finally, we have the Dockerfile that gathers them:
FROM python:3.9-slim
RUN pip install Flask flask-sqlalchemy sqlalchemy_rqlite

RUN mkdir -p /webapp/templates

COPY app.py /webapp/app.py
COPY templates/index.html /webapp/templates/index.html
As you can see, the app.py script has two modes of operation:
initdbwhich connects to the database and initializes the tables used to store its sole model (Line), andrunwhich runs Flask's development HTTP server and listens on Flask's default port:5000.
Both modes accept an additional pair of parameters - the IP address and port of the database server, which we'll be able to pass from the requestor agent script to connect the two services together.
Apart from that, the script contains the minimum to define our extremely simple application. First, we have the model (Line) storing a single line of our chat. And secondly, we have two controller functions:
root_get- aGEThandler, which takes a list ofLines from the database and displays it using the HTML view along with the form that lets the user add a next entry,root_post- takes aPOSTrequest containing the message from the HTML form and appends it to theLines stored in the DB.
Web-app requestor
Above, we have briefly shown you the construction of the app itself just to give you a glimpse of what one might want to take into consideration while building service apps for the Golem Network. As mentioned though, it can be any other setup, language, platform, etc. as long as it's running in a VM on Golem and capable of handling HTTP requests.
Now let's have a look at the most Golem-specific part, the requestor agent code. You'll see that it directly reflects the composition of the app itself.
DB Service class
Let's start again with the DB back-end. Here's the code of the class that takes care of it:
class DbService(Service):
    @staticmethod
    async def get_payload():
        return await vm.repo(
            image_hash=DB_IMAGE_HASH,
            capabilities=[vm.VM_CAPS_VPN],
        )

    async def start(self):
        # perform the initialization of the Service
        # (which includes sending the network details within the `deploy` command)
        async for script in super().start():
            yield script

        script = self._ctx.new_script(timeout=timedelta(seconds=30))
        script.run("/bin/run_rqlite.sh")
        yield script

    async def reset(self):
        # We don't have to do anything when the service is restarted
        pass
The most important parts here are:
- the specification of the VPN capability (
vm.VM_CAPS_VPN) inget_payloadmethod which ensures that the container used to run our DB image will have the capability to connect to the VPN network which we'll create: - and the run command (
script.run("/bin/run_rqlite.sh")) which triggers therqlite's entrypoint in the service's startup handler.
We need to call super().start() in our service's start() to save us from having to issue the appropriate deploy and start exescript commands ourselves. They ensure our container is properly initialized and ready to run other commands.
Finally, the reset is there just to give the service a chance to restart on another provider if it fails during initialization.
HTTP service class
The class that manages the HTTP is slightly more complex but equally straightforward in the way it reflects the underlying service:
class HttpService(HttpProxyService):
    def __init__(self, db_address: str, db_port: int = 4001):
        super().__init__(remote_port=5000)
        self._db_address = db_address
        self._db_port = db_port

    @staticmethod
    async def get_payload():
        return await vm.repo(
            image_hash=HTTP_IMAGE_HASH,
            capabilities=[vm.VM_CAPS_VPN],
        )

    async def start(self):
        # perform the initialization of the Service
        # (which includes sending the network details within the `deploy` command)
        async for script in super().start():
            yield script

        script = self._ctx.new_script(timeout=timedelta(seconds=10))

        script.run(
            "/bin/bash",
            "-c",
            f"cd /webapp && python app.py --db-address {self._db_address} --db-port {self._db_port} initdb",
        )
        script.run(
            "/bin/bash",
            "-c",
            f"cd /webapp && python app.py --db-address {self._db_address} --db-port {self._db_port} run > /webapp/out 2> /webapp/err &",
        )
        yield script

    async def reset(self):
        # We don't have to do anything when the service is restarted
        pass
One immediate difference is that this class does not inherit from yapapi's base Service but from HttpProxyService defined as part of our Local HTTP Proxy module.
By doing this, we're giving it an ability to accept incoming HTTP requests and route them to the HTTP server on the provider's end. To specifically send our requests to the Flask's development server that we have set up in our VM image, we specify the appropriate port (in our case: 5000) as remote_port in a call to the HttpProxyService's init.
We're also giving our HTTP service two additional parameters, db_address and db_port which we'll then use to connect the HTTP server to its DB backend when it starts.
Then, again, as was the case of the DB service, we need to specify the VPN capability in the get_payload method.
As mentioned earlier, our app's script has two modes of operation - the DB initialization and running as an HTTP server. Thus, in the startup handler (the start method), we need to specify those two commands. We need to pass the db_address and db_port to both of them. Additionally, we're saving the app's standard output and standard error to the container's /webapp/out and /webapp/err respectively.
Finally, we also add an "empty" reset handler to enable service's re-launch on failure.
That's it. Now for the part that binds them all.
The main function
Let's have a look at the entirety of the function before we talk about the few important lines there:
async def main(subnet_tag, payment_driver, payment_network, port):
    async with Golem(
        budget=1.0,
        subnet_tag=subnet_tag,
        payment_driver=payment_driver,
        payment_network=payment_network,
    ) as golem:
        print_env_info(golem)

        network = await golem.create_network("192.168.0.1/24")
        async with network:
            db_cluster = await golem.run_service(DbService, network=network)
            db_instance = db_cluster.instances[0]

            def still_starting(cluster):
                return any(
                    i.state in (ServiceState.pending, ServiceState.starting)
                    for i in cluster.instances
                )

            def raise_exception_if_still_starting(cluster):
                if still_starting(cluster):
                    raise Exception(
                        f"Failed to start {cluster} instances "
                        f"after {STARTING_TIMEOUT.total_seconds()} seconds"
                    )

            commissioning_time = datetime.now()

            while (
                still_starting(db_cluster)
                and datetime.now() < commissioning_time + STARTING_TIMEOUT
            ):
                print(db_cluster.instances)
                await asyncio.sleep(5)

            raise_exception_if_still_starting(db_cluster)

            print(
                f"{TEXT_COLOR_CYAN}DB instance started, spawning the web server{TEXT_COLOR_DEFAULT}"
            )

            web_cluster = await golem.run_service(
                HttpService,
                network=network,
                instance_params=[{"db_address": db_instance.network_node.ip}],
            )

            # wait until all remote http instances are started

            while (
                still_starting(web_cluster)
                and datetime.now() < commissioning_time + STARTING_TIMEOUT
            ):
                print(web_cluster.instances + db_cluster.instances)
                await asyncio.sleep(5)

            raise_exception_if_still_starting(web_cluster)

            # service instances started, start the local HTTP server

            proxy = LocalHttpProxy(web_cluster, port)
            await proxy.run()

            print(
                f"{TEXT_COLOR_CYAN}Local HTTP server listening on:\nhttp://localhost:{port}{TEXT_COLOR_DEFAULT}"
            )

            # wait until Ctrl-C

            while True:
                print(web_cluster.instances + db_cluster.instances)
                try:
                    await asyncio.sleep(10)
                except (KeyboardInterrupt, asyncio.CancelledError):
                    break

            # perform the shutdown of the local http server and the service cluster

            await proxy.stop()
            print(f"{TEXT_COLOR_CYAN}HTTP server stopped{TEXT_COLOR_DEFAULT}")

            web_cluster.stop()
            db_cluster.stop()

            cnt = 0
            while cnt < 3 and any(
                s.is_available for s in web_cluster.instances + db_cluster.instances
            ):
                print(web_cluster.instances + db_cluster.instances)
                await asyncio.sleep(5)
                cnt += 1
We start with the usual initialization of the Golem engine (async with Golem(...)) and then the rest of the code is executed inside the engine's context manager to ensure proper shutdown and cleanup after we finish working with our services.
Within this context, the first thing we want to do is to initialize our VPN:
    network = await golem.create_network("192.168.0.1/24")
    async with network:
        ...
This creates the VPN and, behind the scenes, adds the requestor as the first addres in this network. It also enters another context manager, which, this time, will be responsible for tearing down our VPN once we're done with it.
With the VPN in place, we're now ready to commission the first of our services - the DB backend, ensuring that it's added to our just-created VPN by passing the network parameter to the run_service call.
    db_cluster = await golem.run_service(DbService, network=network)
    db_instance = db_cluster.instances[0]
What follows is some helper code that just ensures the DB service is started before we provision our Flask app. We set a timeout of STARTING_TIMEOUT (4 minutes) and we're expecting the DB service to be running before it elapses. Should it still not be ready, we'll exit with an exception.
With the database service running, we're ready to start our web application service:
    web_cluster = await golem.run_service(
        HttpService,
        network=network,
        instance_params=[{"db_address": db_instance.network_node.ip}],
    )
Here, besides also passing the network argument, we're also providing the IP address of the DB instance as the db_address parameter to the HttpService.
And then we wait again, this time for the web application to start on a provider node. Once our web application is up and running, we're finally ready to expose our app to the outside world.
To do that, we start the local HTTP proxy and connect it to our remote HTTP server:
    proxy = LocalHttpProxy(web_cluster, port)
    await proxy.run()
Yay! We're live! We can now tune our web browser to http://localhost:8080 and enjoy our tiny Golem-enabled web app.
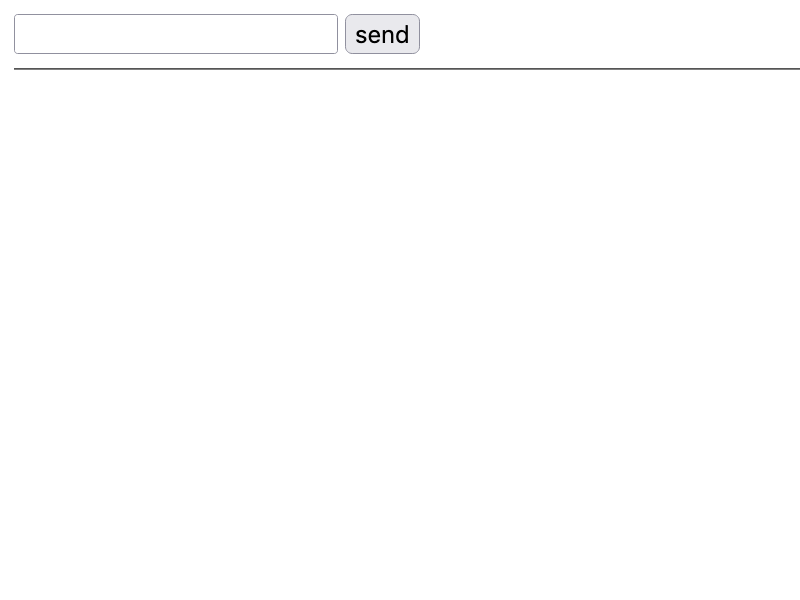
You can now open this address in your browser and you should see a form like this:

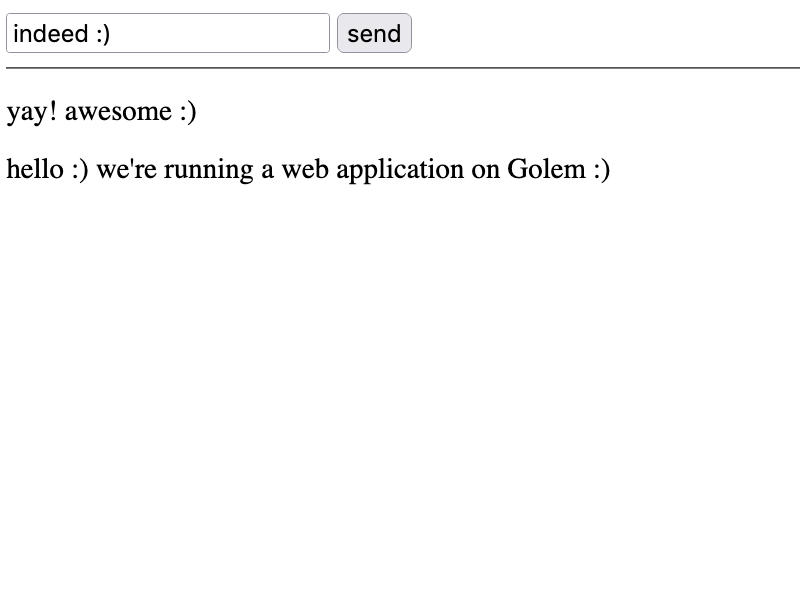
And then, after sending a few inputs, you'll see the resultant "chat" below:

That's all folks!
We'll be interested in seeing how for you can go by applying the same template and using our recently-released Local HTTP Proxy module that's part of yapapi's contrib section.
Feel free to share your own solutions and ask questions on our Discord and Github if your run into issues. Have fun with Golem! :)
- The next article takes a close look at external API request example.